26 Jan 2011
by mariebubblyster
in Card Making, Rubber Stamping
Tags: black soot, card, card making, colors, colours, craft, crafts, distress inks, green, peeled paint, pink, ranger, rusty hinge, spring, tim holtz

I am absolutely loving my Tim holtz distress inks, they are absolutely versatile and give amazing distressed effects to even the simplest of cards.
Can you see the hidden rabbit? I love this topper, and I wanted the rabbit to look shy 🙂
Multi embossed grasses in black and silver, with a dash of peeled paint distress inks complete the look. I also misted the topper with Glimmer mists for a delicate shimmer.
Hope you like this card, A glimpse of the spring to come!!
I’ve entered this card in the following challenges.
- Quirky crafts Spring garden challenge
- Card Patterns Sketch Challenge
Till next time,

02 Jan 2011
by mariebubblyster
in Card Making, Rubber Stamping
Tags: art nouveau, brown, card, card making, colors, colours, craft, cream, dye based ink, promarker, promarkers, rubber, rubber stamp, rubber stamping, victorian, victoriana, vintage
Hiya Peeps,
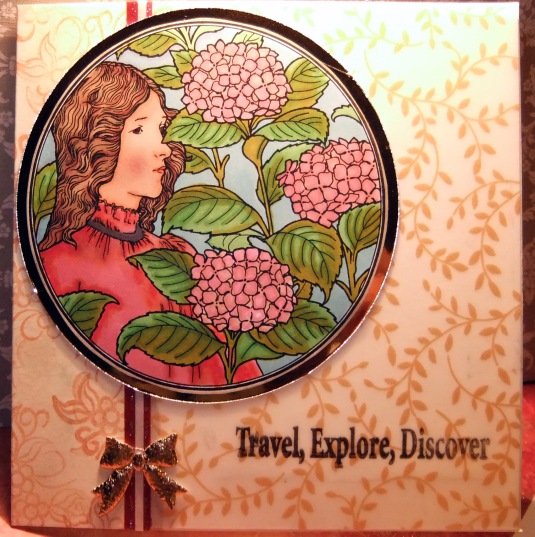
For today’s card, I tried to keep things simple and used an art nouveau theme to create a simple but luxury handmade card.

Travel, Explore and Discover
To make this card, I used
- 13x13cms square cream cardstock.
- The image stamp is from the Dover art nouveau cd’s printed onto Letraset bleed proof paper and coloured in with Promarkers.
- Travel, Explore and Discover stamp from Crafty Individuals.
- Gold printed Vellum from Papermania Signature collection.
- Gold Mirri Board
To achieve a slightly faded vintage look, I tore a piece of paper and used it to cover 2/3rd of my card, after which I stamped my motifs using brown/copper ink pads.
I’m also loving the Dovecraft ready stick ribbons in their Christmas fancy and jolly happy Christmas collections.I’ve used the ribbon here from the Jolly Happy Christmas stick-on ribbon for a card that is far from christmassy.
I’ve entered this card in the following challenges:
Hope you like it!
Till next time,

02 Jan 2011
by mariebubblyster
in Card Making, Rubber Stamping
Tags: card, card making, colors, colours, craft, cream, dye based ink, embossing, handmade, heat gun, ink pads, paper, paper craft, scrapbooking, stamp pad, swirls rubber stamp
I’m starting to love the vintage card trend. Distressed Cards and the like are really gorgeous ways to create trendy cards.
I don’t have any specialist distressing or vintage tools, and so I used the best tool at my disposal – imagination! 🙂
Bit Cheeky, I know, But I am proud of the result. Me thinks it will make a lovely thank you card or even a more generic Best wishes card.

Vintage Looks
31 Dec 2010
by mariebubblyster
in Card Making, Rubber Stamping
Tags: art, card, card making, colors, colours, craft, paper craft, promarker, promarkers, rub on, rubber, rubber stamp, rubber stamping, scrapbooking, stamp pad, stampin, valentine, valentines day card
I may be a little ahead of myself here, but I couldn’t help myself when I saw this little image all stamped up and coloured in Promarkers, just waiting to be used as a topper. What usually happens is, I sit in front of the telly with my stamped images in black ink, my box of Promarkers and use the time in the ad breaks to colour my images. It really is a satisfying and relaxing way to watch telly!
Anyhow I kept it simple and added a paper carnation for effect. Hope you like it!

Love is not what we become, but what we already are.
I’ve entered this card into the Passion for Promarkers Mega Christmas challenge.
Till next time!

30 Dec 2010
by mariebubblyster
in Rubber Stamping, Tutorials
Tags: acrylic stamps, art, card, card making, clean, cleaning, clear, craft, ink pads, paper craft, rubber, rubber stamp, rubber stamping, scrapbooking, stamp pad, stampin
When cleaning your stamps, you have many options. You can use soap and water, a baby/face wipe or a specialist cleanser preferably with conditioner in it so it will keep your stamps fresh and new for a long time to come.
I prefer a solvent type cleaner that removes any ink or paint I might be using. Try Papermania, Clear Stamp Cleaner. As matter of personal choice though, I do not over clean my stamps as it can damage the cushion under the stamp and loosen the adhesive in wooden stamps and may damage the longevity of acrylic stamps.

Good as new!
- Apply a generous amount of stamp cleaner to the rubber stamp
- Blot the stamp on a clea,dry paper towel and reuse as neccessary or store.
Till next time!

28 Dec 2010
by mariebubblyster
in Card Making, Uncategorized
Tags: birthday, card, card making, craft, happy birthday, paper, rub on, rubber stamp, scrapbooking, summer
Today, I got a tad tired of all the wintry cold. To cheer myself, I decided to remind myself of the summer days yet to come. Looking through my stash to find the brightest, summery papers inspired me to make this card, which is joining the ranks of my favorite cards simply because it is so pretty! 🙂

Bestest Friends

I think I’ll send it off to my bestest girl pal whose birthday is in April. Till then, you guys can have a go.

If you’d like to get these beautiful glittered Rub-ons for yourself, Get it here.
Tell me what you think,
Till next time

21 Dec 2010
by mariebubblyster
in Card Making, Rubber Stamping
Tags: art, card making, colors, colours, copic, craft, dye based ink, heat gun, ink pads, memento, promarker, rubber stamping, stampin, tip
Promarkers and Copics are alchohol, solvent based ink pens which when used with other solvent based inks such as staz-on etc, can lead to feathering or dissolving your stamped design.
Use Memento ink pads which are dye based inks and therefore repel the solvent in your pen ink, thereby preventing all your problems!
Top Tip!!

19 Dec 2010
by mariebubblyster
in Card Making, Rubber Stamping, Tutorials
Tags: art, books, card making, colors, colours, craft, embossing, heat gun, heat tool, powders, rubber stamping, silver, stampin, swirls rubber stamp, tutorial
This technique produces a soft metallic finish on paper. It is great to try over an image that did not emboss well or one that is splotchy.
Shopping List
- Swirl Stamps – I bought mine at Hobby Craft , but try these Curly Flourish.
- Silver Ink Pad – Use your own or Check it out from my store
- Blue, Red and Pink dyes – assortment of colours
- White card stock
- Silver embossing powder and heat gun.
Swirly Metallics
- Ink the swirl stamp and stamp onto white card stock.
- Sprinkle silver embossing powder onto the card and then tap out the excess.
- Heat set the powder with a heat gun.
- Completely cover the image again with the silver stamp pad.
- Rub the silver pigment ink into the surface of the card with your finger.
- Squeeze a few drops of blue ink dye into a small container, with your finger smooth out the ink so it is fairly thin.
- Buff with your inky finger onto the card, so that the ink sticks to the recessed areas. Continue buffing with other colours of your choice.
- Heat set the ink and dye with your heat tool.
- Buff the cardstock with a paper towel to bring out the sheen.
Excerpt from Creative Card Making .
.
How did you like this tutorial? Do post some of your own art and how you used it.
Till next time,


